Opposition and the Square You Cannot Cross
Learn to treat opposition as a contest for king access: identify the target square, choose the right approach, and check whether the pawn can actually promote.
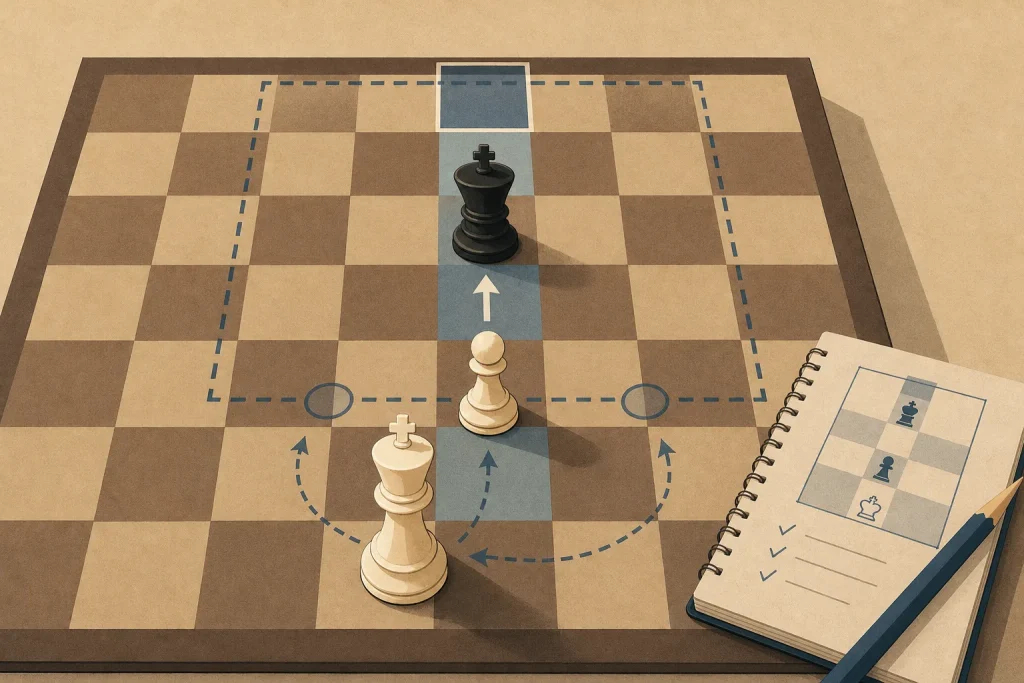
The common mistake in a king-and-pawn ending is to march the king straight towards the pawn and assume that the closer king must be better. That can let the defending king block the route and leave the pawn stranded. Before moving, identify the promotion square, the entry squares your king needs, and whose turn it is.
Find the target
Locate the pawn’s promotion square and trace the route your king needs to take. The pawn may look like the main actor, but the king often decides whether it can advance safely. Mark the squares immediately in front of the pawn and on the neighbouring files; these are possible entry points, not automatically winning squares.
For example, with White’s king on e4, White’s pawn on e5 and Black’s king on e7, White is to move in the position described here. The pawn cannot move through the king on e7, and White’s king cannot move onto the occupied e5 square. The position therefore needs calculation: note legal king moves, then check whether Black can keep the pawn blocked or capture it. Do not infer a win simply from the pawn’s advanced position.
Use a physical board or an analysis board in Lichess. Mark the pawn’s file, its promotion square and the candidate squares for the supporting king. For each candidate, check whether the opponent can occupy or attack that square on the next move; if so, test another route rather than treating the square as secured.
Read the opposition
Opposition describes a specific king alignment and move relationship; it is not a verdict on the ending by itself. When kings stand on the same rank, file or diagonal with an odd number of squares between them, the player not to move may have the opposition. Whether that wins useful access depends on legal moves, pawn placement and the squares each king must reach.
In the position above, White’s king on e4 and Black’s king on e7 are separated by two empty squares, with White to move. This is not the odd-gap alignment described by the rule. White should not claim the opposition from that arrangement. Instead, list legal king moves and evaluate Black’s replies; the pawn on e5 also means the kings do not have an unobstructed file between them.
Before choosing a move, check whose turn it is, whether the kings are aligned without an intervening piece, and which entry squares matter. If a king move gives the other king access to a needed square, choose a different candidate if one exists; if every route concedes access, calculate whether the pawn can still advance safely.
Choose an approach
You can seek access directly by using opposition, or approach from the side to make the defender choose which entry squares to concede. Which route works depends on the pawn’s file, both kings’ locations and the defender’s legal replies. Never call a sideways move a waiting move until you have checked what the opponent can do afterwards.
Say you are White in the stated position: White king e4, White pawn e5, Black king e7, White to move. Set the pieces on a board and compare the legal king moves one at a time. If White moves the king to d4, Black can answer with a legal king move such as d7, keeping the king near the pawn’s advance route; White has not demonstrated a breakthrough. If White instead moves the king to f4, Black can consider f7, again preserving a nearby blockade. The observable result of these candidate lines is that neither move alone proves access or a win. Continue by checking the pawn’s legal advance and Black’s capture or block replies; if the pawn cannot advance safely, the king route has not solved the ending.
For each candidate, ask whether your king still threatens to enter, whether the defender can answer while retaining the block, and whether the pawn remains protected. If the defender can return to the critical square without conceding another route, reject the idea of a forced breakthrough and calculate a different plan.
Check the pawn route
Once your king appears to gain access, verify that the pawn can advance. Play through the defender’s best replies rather than stopping when your king reaches a promising square. If the enemy king can capture the pawn or block it safely, the route is not enough.
A central pawn gives the defending king more approach routes than a pawn on the edge. A rook’s pawn can be especially difficult because the board edge restricts the attacking king and may leave the defender with a corner refuge. Check the promotion square and whether your king can force the enemy king away from it.
Track the pawn one move at a time. If it advances, can the enemy king capture it? If the defending king blocks, can your king dislodge it without losing the pawn? If the pawn is passed, can your king control the promotion square? If any answer is uncertain, keep calculating rather than relying on the word “opposition”.
Use the square rule
For a passed pawn running without help, the square rule is a quick way to assess whether the enemy king can catch it. Draw an imaginary square with one corner on the pawn’s current square and the opposite corner on its promotion square; the square’s sides extend towards the adjacent files and ranks. The king can catch the pawn if it can enter that square in time, assuming the pawn and king have clear routes and no other pieces interfere.
Count from the pawn’s current square, not from its starting square. For a pawn on e5 heading to e8, the distance is three ranks; the imagined square runs from e5 to e8 and is three files wide, extending to the adjacent files. With the enemy king on e7, it is already inside that area, so the rule does not suggest the pawn will outrun it. This is a race check, not a complete evaluation of the position.
The rule’s basic form assumes an unobstructed pawn run and a king able to move freely. Whose turn it is can matter at the boundary, so play the moves on the board whenever the result is close. Opposition answers a different question: whether one king can gain access or force the other away. Use both ideas, then calculate the actual line.
Test the result
Before committing to an exchange or pawn advance, test the defender’s most stubborn reply. Keep the defending king in front of the pawn and look for a move that forces your king to choose between supporting the pawn and controlling the promotion square. If the plan works only against a passive reply, it is not yet sound.
On a physical board or in Lichess, reset the position after each candidate. Follow the line until the pawn promotes, is captured or is blockaded, then rewind and test another king move. Record the position and side to move so you do not compare different versions of the ending by accident.
Write down the critical square and why it matters in plain language, such as “White needs to reach d6 before Black can occupy it.” Then check the opponent’s reply to that exact move. If Black can prevent the king from reaching d6, revise the plan; if not, continue calculating whether the pawn can advance safely.
Keep the distinction
In a king-and-pawn ending, identify the promotion square, mark the king’s possible entry squares and check whose move it is. Use opposition to assess a specific contest for access, and the square rule to screen an unsupported pawn’s race. Then calculate the defender’s best blockading reply and confirm that the pawn can complete its route.
The king closest to the pawn does not automatically control the ending. What matters is whether it can cross the squares the defender is holding and whether that crossing leaves the pawn a safe route to promotion.
Related positions
A Game Score That Teaches You Something
Turn a recorded chess game into a useful study session by separating what happened from what…
Choosing a Plan When Both Wings Matter
When both sides of the board offer chances, compare pawn breaks, piece routes and the opponent’s…