Choosing a Plan When Both Wings Matter
When both sides of the board offer chances, compare pawn breaks, piece routes and the opponent’s reply before committing your forces.
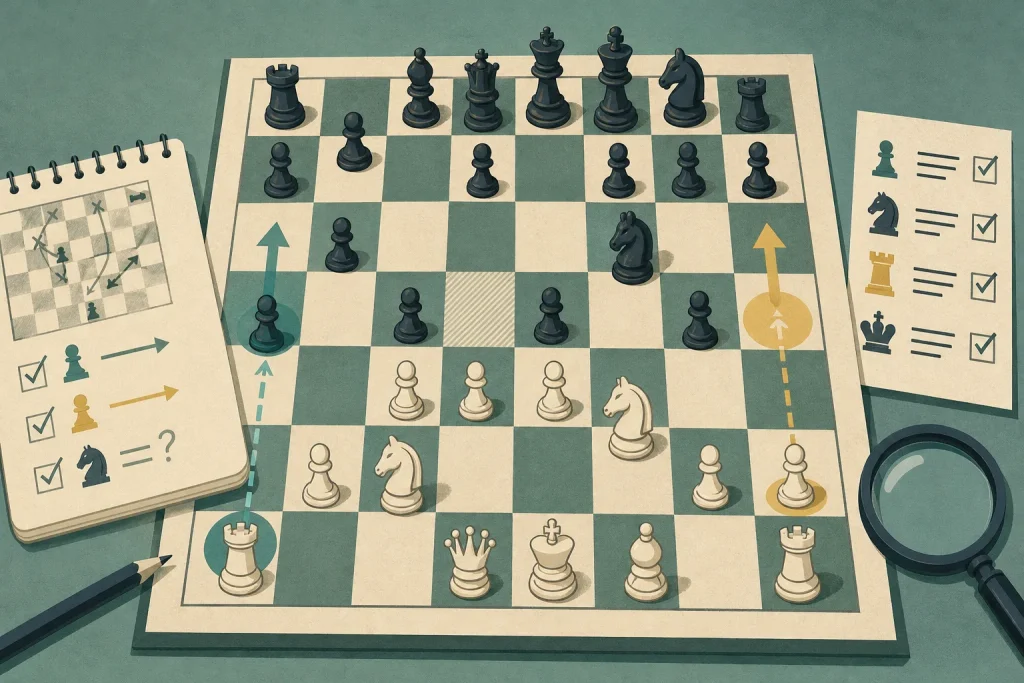
The common mistake in a two-wing middlegame is to pick the side that looks more inviting and send pieces there before checking what the opponent can do elsewhere. That can leave a rook staring at a closed file while a pawn break on the other wing opens lines against your king. A sound plan begins by comparing the board’s demands, not by choosing the most attractive target.
Read the whole position
When both wings matter, the position usually offers more than one useful direction. You might have space on the kingside but a passed pawn to restrain on the queenside. Or your opponent may be preparing a central break that would make either wing plan irrelevant unless you deal with it first.
Start with a brief scan of the centre, both wings and both kings. Ask what can change immediately: which pawn can advance, which file can open, which piece is under pressure, and whose king could become exposed? A plan is not just a destination. It is a sequence of moves that remains sensible as the position changes.
Separate immediate threats from longer-term opportunities. If the opponent threatens to win material or open your king, respond to that first. If neither side has a forcing threat, you have room to improve your position and compare candidate plans.
Let the pawns set terms
Pawn structure often tells you where play can realistically happen. Pawns restrict pieces, define open files and determine which breaks can change the shape of the position. Before deciding to attack on a wing, identify the pawn move that would make that attack more than a collection of hopeful piece moves.
Look for a break that can open a file, create a passed pawn, or force an exchange that improves your pieces. If your pawns are locked, a pawn storm may only hand your opponent useful squares. A wing can look spacious yet offer no safe route through the pawn chain.
Compare the break on each side. Which one can you prepare without weakening your own king? Which one will the opponent be able to block? If a break requires several preparatory moves, consider whether the opponent can use that time to create a more urgent threat.
Pawn structure also sets the cost of changing plans. A pawn that advances cannot retreat, and a move that opens a file may expose a rook or king. Before pushing, ask what squares and lines the move gives up. Sometimes keeping the tension is more valuable than resolving it at once.
Check the piece routes
A promising wing plan needs pieces that can reach the right squares. Trace each relevant route: can a knight arrive without being chased away, can a rook use an open or half-open file, and can the queen join without blocking a more useful piece? A plan may be strategically appealing but too slow if its main pieces are poorly placed.
Prefer improvements that serve more than one purpose. A rook placed behind a pawn break may support the advance and later occupy the file it opens. A knight manoeuvre might guard a central square while also moving towards the wing where pressure is likely. Such moves preserve options while making progress.
Check what your opponent can exchange or dislodge. If your attack relies on one bishop, ask whether it can be traded. If a knight has only one route to its intended square, check whether a pawn push can shut that route. Plans built around a single fragile piece often need a backup route.
Do not confuse activity with usefulness. A piece can look lively on a wing yet have no target, no support and no way to create a threat. A quieter central square may be better if it helps control both wings and lets you respond to the opponent’s choice.
Price the counterplay
Compare plans by asking what the opponent gets while you carry yours out. If you attack on the kingside, can the opponent open the queenside? If you push a queenside pawn, can their pieces invade through the centre? The answer may make a plan too slow, even when its end point looks attractive.
Count useful replies rather than imagining only the move you want to face. Consider a blocking move, an exchange, a pawn break and a counterattack. You do not need to calculate every legal move. Focus on the replies that would change the pawn structure, expose a king or force one of your key pieces away.
Pay particular attention to lines that open. A closed position may allow time for a gradual manoeuvre; an open file can make a single tempo matter. Before launching a wing advance, check whether the opponent’s counterplay arrives with threats or merely improves their position.
King safety is part of this comparison. Advancing pawns near your own king may create attacking chances, but they can also remove defenders and open lines. If the opponent has a clear route to your king, you may need to secure it or force a useful exchange before committing.
Compare plans directly
Put the candidate plans side by side. For each one, name the first useful move, the pawn break it supports, the pieces it needs, and the opponent’s strongest practical response. This turns a vague choice between wings into a comparison of concrete tasks.
Then ask what happens if the opponent answers well. Does your plan still leave you with a good position, or does it depend on them ignoring a threat? A robust plan may not promise an immediate attack, but it should improve your pieces, protect against counterplay and keep another option available.
Consider the centre before choosing either wing. A central break can open lines towards both kings and change which side of the board matters. If the centre is unstable, a move that reinforces it may be more urgent than a wing manoeuvre. If the centre is locked, a slower plan on one side may have time to gather force.
Say you are playing a middlegame with a closed centre, a queenside pawn majority and a kingside space advantage. Your pieces are aimed towards the kingside, but the opponent is preparing a queenside pawn break. You could push a kingside pawn at once, or first place a rook behind your queenside pawns and move a knight to help restrain the break. If that setup leaves the opponent unable to open lines quickly, you can then choose whether the kingside advance is safe; if it does not, the quieter move has exposed the urgency of defending the queenside before attacking.
Keep options open
When the plans are close, choose a move that improves your position without closing off a useful alternative. A developing move, a rook transfer or a well-placed king move can prepare one wing while keeping control of the other. The best choice is often not the most forcing move, but the one that makes your next decision easier.
Be willing to change course when the opponent changes the position. If they commit to a wing, the other side may become the better place to act. If they exchange a key defender, a previously slow plan may become urgent. A plan is a working judgement, not a promise to continue regardless of the board.
After each move, check whether the original conditions still hold: is the pawn break available, are the necessary pieces still on the board, and has the opponent’s counterplay become faster? This small review prevents you from continuing an attack simply because you began it.
Use a practical comparison
At the board, keep the decision manageable. Identify the strongest pawn break on each wing, trace the pieces needed to support it, and look for the opponent’s most active reply. Then choose the plan that makes progress without giving away a more urgent target.
- Centre: Is a central break or threat more urgent than either wing plan?
- Pawn structure: Which wing has a useful break, and what will that break open or weaken?
- Piece placement: Can your pieces reach the required squares in time?
- Counterplay: What is the opponent’s strongest reply while you prepare?
- King safety: Does your plan leave your king exposed or remove an important defender?
- Flexibility: Can your next move improve the position while keeping another plan available?
Use the comparison to decide, not to build a rigid script. If one side offers a clear target and your pieces can reach it while the other wing stays secure, commit there. If neither plan is ready, improve a piece, restrain the opponent’s break or stabilise the centre; the next position may make the choice clearer.
In analysis, revisit the moment when you chose a wing. Write down the pawn break you expected, the route your pieces needed and the counterplay you considered. This makes it easier to see whether the decision failed because the plan was wrong, the timing was off, or a useful reply went unnoticed. On the next move, compare the board again rather than defending the old choice.
Related positions
A Game Score That Teaches You Something
Turn a recorded chess game into a useful study session by separating what happened from what…
Opposition and the Square You Cannot Cross
Learn to treat opposition as a contest for king access: identify the target square, choose the…